Nesting Center Frequently Asked Questions
Get Started
The nestingcenter.com website is an online nesting service. The website uses Automatic Nesting Library provided as a cloud service (SaaS).
What is the difference between Basic and Professional subscription?
Nesting Center Professional subscription offers unlimited functionality. Nesting Center Basic subscription is a cost-effective option with monthly layouts limit and parts limits. The monthly layouts limit specifies how many layout calculations can be started during one calendar month and is renewed every new month. The parts limit specifies the maximum number of parts which can be placed on the material.
What are Free subscription usage limits?
In order to maintain an efficient, high-performing and cost-effective service, Nesting Center places limits on the amount of computation resources that can be consumed in any given period. The parts limit specifies the maximum number of parts which can be placed on the material. The layouts limit specifies how many layout calculations can be started during one calendar month. Nesting Center Free limits can change depending on the service usage.
Can we integrate Automatic Nesting Library with our CAD environment?
Yes. Automatic Nesting Library, as a cloud service (SaaS), can be integrated with any CAD application.
Can the Nesting Center team provide integration services?
Yes, we can help you with programming. Please contact us using the Contact page.
Can we use Automatic Nesting Library offline?
No, currently we do not provide the library offline. Please contact us if, due to security reasons, you are not able use our online service.
How can I get training or web application usage instructions?
We try to make our web application as self-explaining as possible. Please review this FAQ page and contact us, if you would like to receive more information.
Parts and Material
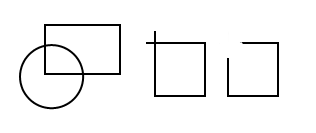
On the Parts tab, click the Import DXF/DWG button , select file(s) from a local directory and click the Open button. The shapes can be uploaded as DXF or DWG files. Our importer attempts to collect non-intersecting shapes from the collection of entities in the drawing. A shape can be constructed as a single entity (a polyline or a circle), or multiple entities – arcs, lines, polylines, splines, elliptical arcs – as long as they form a closed loop. Geometry specified in blocks is supported. Loops wholly within other loops are interpreted as holes. See below for the examples of valid shapes.
 Parts can be stored in individual files each – the DXF/DWG file name (without the extension) will be used as the name of the part.
Parts can be stored in one file – all parts will get the name from the DXF/DWG file, with an additional sequence suffix.
When I upload my DXF file, some of its contents are not converted into parts. What’s wrong?
The most likely explanation is that the shapes intersect or do not form closed loops. See below for the examples of invalid shapes.
Can I multiply imported parts?
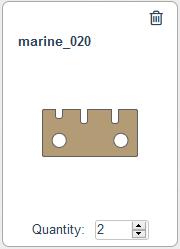
Yes, part can be multiplied using the Quantity field.

How can I remove parts from my nest job?
On part preview tile, click the part Remove button , or click the Remove all button on the form to remove all uploaded parts. Parts will be removed only from the web client form.
How can I define material?
Material can be imported together with a loaded project (please see How do I start nesting?).
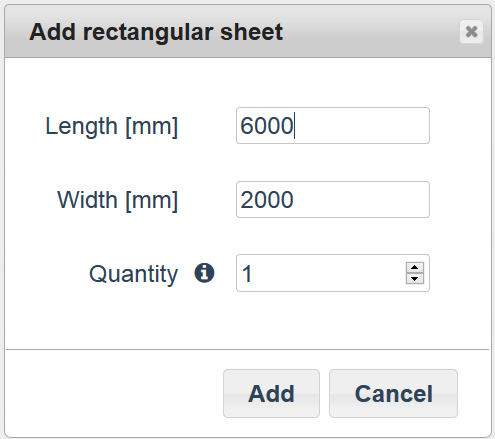
Using the Add button you can define a rectangular material sheet.

Key in size (Length and Width), quantity, and click the Add button.
Material can be imported from DXF/DWG file (please see Can I define non-rectangular material?)
Can I multiply material sheets?
Yes, material can be multiplied using the Quantity field.
How can I remove material from my nest job?
Click the material Remove button to remove a single material size, or click the Remove all button on the form to remove all defined material sheets.
Can I define non-rectangular material?
Yes, any material shape can be imported from DXF/DWG file. This function allows using remnants.
On the Material tab, click the Import DXF/DWG button , select a file from a local directory and click the Open button.
The material shape will be presented in the preview. The material name is the same as the name of the DXF/DWG file (without the extension). Quantity can be changed. However, if you use material handling and remnants, leave it as 1.
I made a mistake while defining material, how can I change it?
On the material preview tile, click the Edit Material and make all necessary changes using the material editing form. Currently only rectangular sheets can be modified.
How can I set material to be used first?
On the material preview tile click the Set Priority button . The material sheet will be moved to the beginning of the list, the pin icon color will be changed , and material will be used first.
How do I optimize raw material?
Our product can determine the optimal set of material sizes and quantities to be used with the parts provided. When specifying the material sizes, set a large quantity (such as 100) against each size and the amount of material will be selected automatically.
Nesting settings
Which nesting defaults can be changed by the user?
- minimum distance between parts,
- minimum distance between a part and a raw material edge,
- part mirror – can be Disabled/Allowed or parts can be always mirrored,
- part rotation – can be Disabled, parts can be rotated by 90 and 180 degrees or by any angle,
- nesting direction (for example parts will be moved down and then to the right),
- additional rotation range up to 5 degrees,
- whether nesting process can use material inside holes.
How can the user control nesting time?
- all parts are nested,
- total scrap % reaches the defined limit,
- there is very little chance that the result will be improved further (the Smart stop option),
- the specified timeout is reached (default 300 seconds).
The criteria above can be activated/deactivated independently of one another.
Nesting process
Simply navigate to the Online Nesting page. On the File tab, select an empty project, or select one of the available examples, or click the Load button to load an existing project from a local directory.
How can I save my project data?
On the File tab, click the Save button , select a file from a local directory and click the OK button.
Parts, raw material and nesting settings will be stored in the local file for future use.
How can I start the nesting job?
When the parts are imported and material defined, the user can start the nesting job.
On the Run tab, click the Start button .
How can I finish the nesting job manually?
The user can wait until one of the stop criteria is reached, or can stop the job manually.
On the Run tab, click the Stop button .
What kind of process information can the user see on-screen?
- used material sheets count,
- used material sheets total area,
- nested parts (already nested/total quantity),
- nested mass,
- scrap % without the possible remnant,
- time used for current result calculation.
How can I export the result to a local file?
To export results from the web client, click the Export button on the Run tab, fill required contact information (we ask for it only once) and click the Submit button.
Why do I need to provide contact data before exporting?
Our service is free of any charge and provided contact information is only for our internal records. Your data will not be disclosed to any third parties. Submitting means, you agree to these terms. The free use of the software may be subject to change in the future.
How can I start a new nesting job after successful result exporting?
Navigate to the File tab and select the An empty project tile. All previously defined data will be removed, then the user can import new parts and define new material.
